Whenever tracking a form, a must noted thing is the way the form submission page behaves after you click on the “submit” button. Based on what happens next, the correct method of tracking is determined.
This article will guide you through some smart tactics that will help you track forms and make relevant outcomes out of them.
Before you choose the right method for tracking the form, figure out the form type. When you fill information in the form, one of the given below things happen.
1. You are directed to a success page resulting in the change in the URL.
2. You are directed to a success page but no change in URL happen.
3. You remain on the same page instead and a “thank you” message appears on the screen.
Apart from these three cases, we are also going to discuss WordPress Plug-in Contact form 7 and how we can track such forms.
Prerequisites: Google Tag Manager (GTM) and Google Analytics (GA) must be deployed in the browser as extensions and you should also have opened GTM and GA in other tabs.
Now, let’s see what we should do in such conditions.
1. Simple Tracking System
This is for the first case when you are directed to a success page and the URL changes. Get on the page you have the form to track. Fill this form with “test” credentials and click on “submit”. When this happens, check for the change in URL if it changes then you are going to call it a success and track this page.
You will notice conversion done in your Google Analytics account in real-time. Now, you can confidently classify this as Goal if the conversion happens.
In your Google Analytics:
1. Admin -> Goals -> +New Goal -> “Goal Set-up” as “custom” ->continue
2. Now, under “Goal Description” enter the goal name and set types as Destination -> continue.
3. In “Goal Details” set “Equal to” [URL of the page].
4. Before saving “verify this goal” and after you have checked for real-time conversions and you think that it’s all set, click on save.
This was simple from the tracking system, easy huh?
2. Built-in Form Submit Trigger
This is for the 2nd case when you are directed to a success page but you notice that no URL has changed. In this case, when you have no URL then you need to be a little smart with your eyes and tricky with your hands.
1. Go to Google Tag Manager -> Trigger -> New -> Title the trigger.
2. Choose configuration as “Form Submission” and click save.
3. Go to Variables -> configure built-in variables -> Forms -> Check all Forms Variables.
4. Click on “Preview” and then go back to the page and submit the form again.
5. Note that when you click on “submit” everything will happen quickly that you will not be able to track anything so it is advised to get this success page in another tab by pressing the control key on your keyboard as you click on submit.
You’ll get to the debug mode of Google analytics.
The old tab will be the same while you’ll be directed to a new page. Click on the older tab.
In the debug mode, go to variables -> Form Id. This form Id is/ should be unique to every form of submission present on the page. Verify it by submitting any other form on the page and noticing if the Form Id changes.
Follow the steps down below now:
1. Go to GTM -> Trigger -> Form trigger. Now the configurations you left to default in the second step will be filtered to your submission form.
2. Click on “Some Forms” and choose variables as [“Form Id”] [equals to] [Enter the Form Id].
3. Go to GTM -> Tag -> New -> Event tag -> Title it as “Contact Us Submit” -> Tag Configuration as Google Analytics –Universal Analytics.
4. After doing this, set the following options: Track type: Event.
Category: Form Submit.
Action: Contact US
Label and Values can be filled or unchecked as you want.
Non-interaction hit: false.
Select Google Analytics Setting Variable as one given.
Now configure your trigger by clicking on the trigger. Choose the trigger as “Form- Contact US“. Save it.
Refresh all tabs and fill out the form again. In Google Analytics, you’ll see the submission in real-time.
You can build a goal out of this if you are satisfied with the results you got.
Google Analytics -> Admin -> Contact Us-Submit form -> set Goal Description as “Event“. Under Goal Details choose action and category as you chose in GTM.
3. Built-in Element Visibility Trigger
In 3rd case, you are neither directed to a new page nor the URL changes but instead a thank you message is displayed when you submit the form.
In such a condition, if you have a little knowledge of CSS then it will be quite easy for you. But in case you don’t have then don’t worry this article will guide thoroughly.
1. Go to Google Tag Manager and follow the step “2”.
2. Triggers -> New -> Trigger Configurations -> User Engagement -> Element Visibility.
This “Element Visibility” will read what is visible on the user’s screen. It keenly inspects the page and notes the changes happening.
3. Assuming you are in the preview of GTM, right-click on this thank you message to “Inspect” the message in your browser.
4. You will go to your browser’s developer tools. Observe the changes when you refresh the pages and when you resubmit the form.
5. In your GTM’s element Visibility section you will see the selection method. If in the observations in the previous step you notice any id then keep this method as ID and fill element ID. But in case it doesn’t happen, proceed for the next step.
6. Choose the selection method as a CSS selector.
7. Now, into your browser’s developer mode that you opened in the form tab, go to the console column. And write the command document.query.Selector(“div wpcf7-mail-sent-ok”).
8. Here, you type the div class that would probably look like <div wpcf7-mail-sent-ok>. Click Enter.
9. The output of this previous step should be the same observation that you noticed in the “4”. If it is the same then you have correct CSS selector and you should put this in “Element Selector” under GTM.
10. Configure the following: a) When to fire this tag as Element appears on screen every time. b) Advanced
The minimum percentage visible can be 50. Check to observe DOM changes.
Check “All visibility events“.
Give this trigger a name as ‘Visibility- form success message’ and then save it.
Refresh this page and connect this trigger with tags. – Now, go to Tag in GTM then to GA- Contact Us Submission and connect it with “Visibility- form success message” by triggering it.
How to track Contact Form 7 using Google Tag Manager
WordPress provides over 1600 plug-ins for contact forms but Contact Form 7 is probably the oldest and most preferred plug-in. Contact Form 7 is very customizable and capable of handling multiple contact forms. Let’s discuss tracking Contact Form 7 then.
Just like the third case’s Element Visibility, here, we have an auto-event listener; a small piece of code that keenly notices [listens] to the changes happening on the screen.
It will look for wpcf7mailsent DOM events and if one occurs, it will push some essential data like event name, form id, and values of all form fields to the Data Layer and cf7submission will now be done.
<script>
document.addEventListener( 'wpcf7mailsent', function( event ) {
 window.dataLayer.push({
 "event" : "cf7submission",
 "formId" : event.detail.contactFormId,
 "response" : event.detail.inputs
 })
});
</script>
To implement this code, go to your Google Tag Manager account and create a Custom HTML tag that fires only on contact form pages. Open the GTM debugging console by “Preview” in GTM and then refreshing the website page containing the form. And now verify by submitting the form to check if your get expected results.
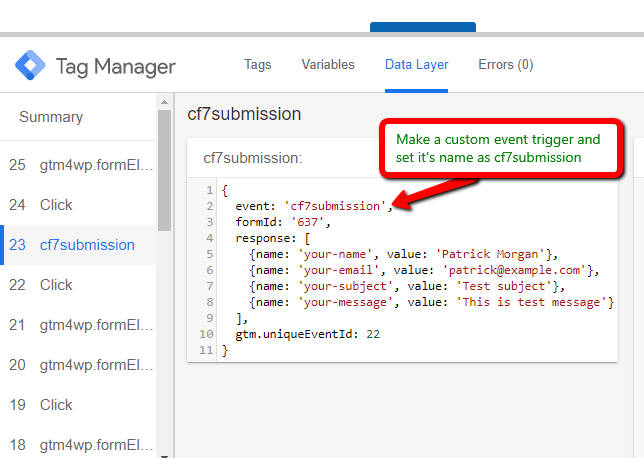
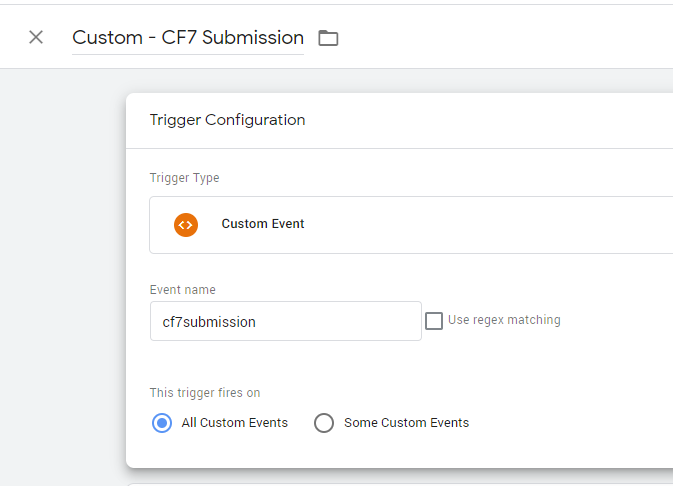
If you want to turn some Data Layer event (in our case, it’s cf7submission) into a tag-firing condition, you need to create a custom trigger.
Contact form 7 also pushes formId, and a ‘response’ array of 5 objects that are nothing but the form fields. This response array will contain the same number of objects as many your form field has when you’ll check from in GTM preview and debug mode.
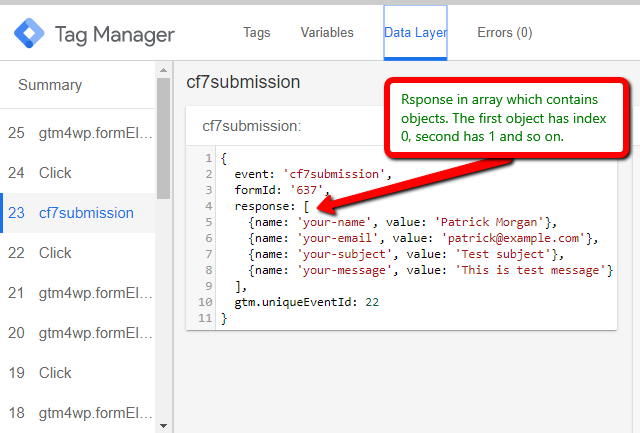
The indexes here start from 0 so the first object is at index 0, second at index 1, and so on. Suppose you want to track the “Your Email” field so you will pull out index number 1 as the second object is on the first index.
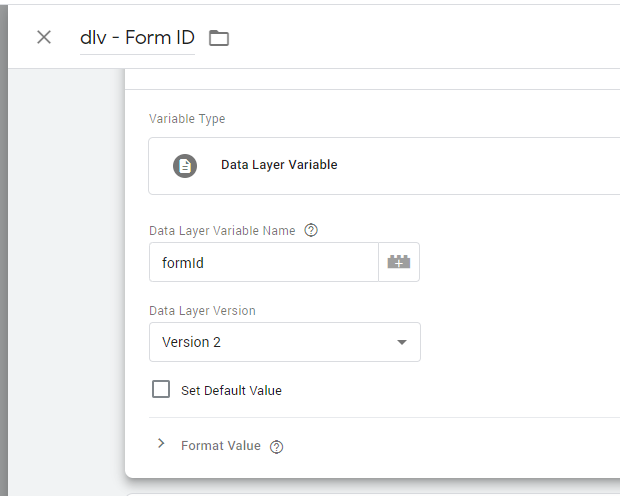
Now, set up variables and triggers just like we set up in the previous steps. But keep the variable configuration “Data Layer Variable” this time.
The data variable name should be response.1.value.

If you have multiple forms on your website then make an additional variable as “formId“. This will help you track the different forms present easily.
Now create a Google Analytics event tag and put these dlv variables in the category and action items.
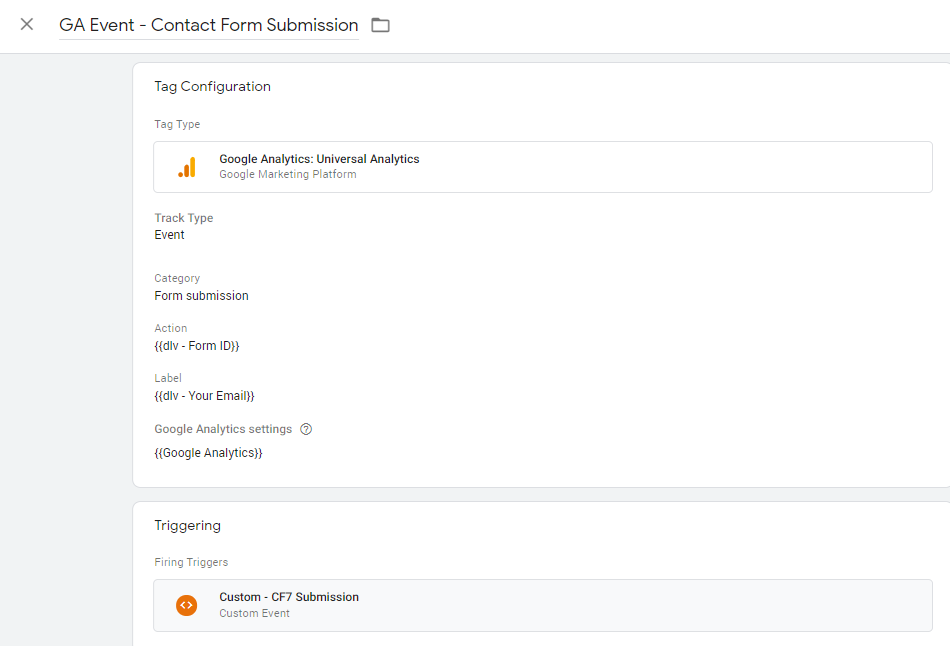
Test these variables to see if you get the desired outcome. Make a Google Analytics event tag through GTM as we did in the second step. The use the custom CF7 form submission trigger for this tag that we created previously.
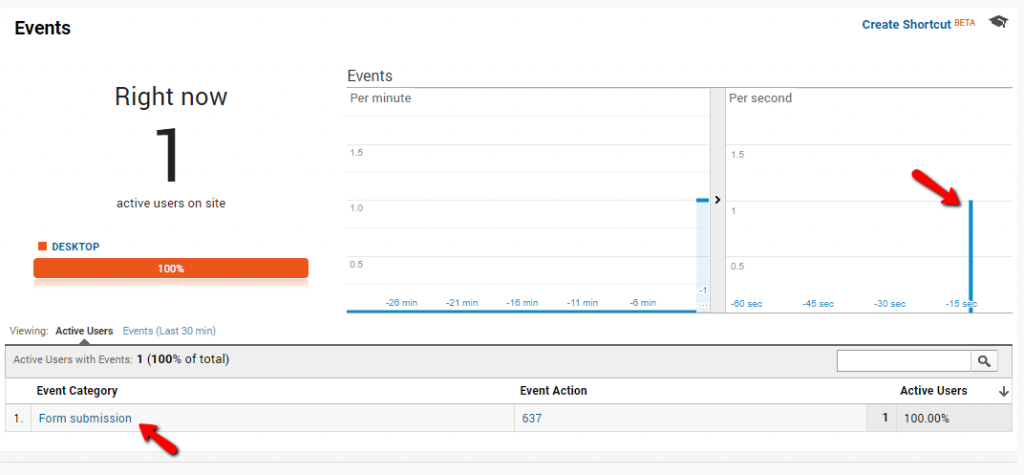
If everything is fine, you’ll see form submission event tag being recorded in real time in Google analytics. Now you can use this event tag to create a goal in analytics and import this goal as a conversion in Google ads.
Conclusion: In this article, we’ve learned how to track form submission using Google Analytics and Google Tag Manager. First, we have learned about various techniques of form tracking and then we specifically learned how to track Contact Form 7 using Google tag manager. I would like to hear your opinions or questions in the comments section below.